Primitive Heart Object w/ Raytrace Usability
My computer graphics elements: 1. Contruct a primitive object using object first rendering and drawPixel 2. Fill the interior of non-uniform object 3. Curved Text 4. Compressing or stretching a primitive object 5. Digital Differential Analyzer(DDA) Line Drawing 6. Transferring the Primitive Object to a Raytracer 7. Implementing Light Fall Off/Fade in a Raytracer 8. Multiple Light Sources within a Raytracer To demonstrate my study and research: 1. I will be rendering a 2-D Heart object 2. I will use methods learned in the jello lab to implement double buffering. 3. The heart will beat in an endless loop. 4. I will write curved text saying "LOVE" 5. I will create a looped gif using the screenshot methods we learned. 6. Render the heart within raytrace to demonstrate it's usability across display methods. 7. Modify Raytracer framework to include multiple light sources and atomospheric fog/perspective within my Heart raytraced scene. 8. First half of project utilized week 5's jello framework 9. The Raytracing portion was built on Lab 8's raytrace. An Image that I hope to replicate and build on: Here is the simplest version of the heart function I wrote:
 The math has been changed since the original implementation to better match the
heart look that I'd like. This is a parametric definition. More info can be found
at mathworld.wolfram.com/HeartCurve.html
This version simply draws a heart outline scaled using the xscalar for the
size along the x-axis and the yscalar for the size along the y-axis.
The drawFilledHeart() version is much longer and would not fit very well on
a webpage so I'm using this to illustrate the gyst of how it works.
The math has been changed since the original implementation to better match the
heart look that I'd like. This is a parametric definition. More info can be found
at mathworld.wolfram.com/HeartCurve.html
This version simply draws a heart outline scaled using the xscalar for the
size along the x-axis and the yscalar for the size along the y-axis.
The drawFilledHeart() version is much longer and would not fit very well on
a webpage so I'm using this to illustrate the gyst of how it works.
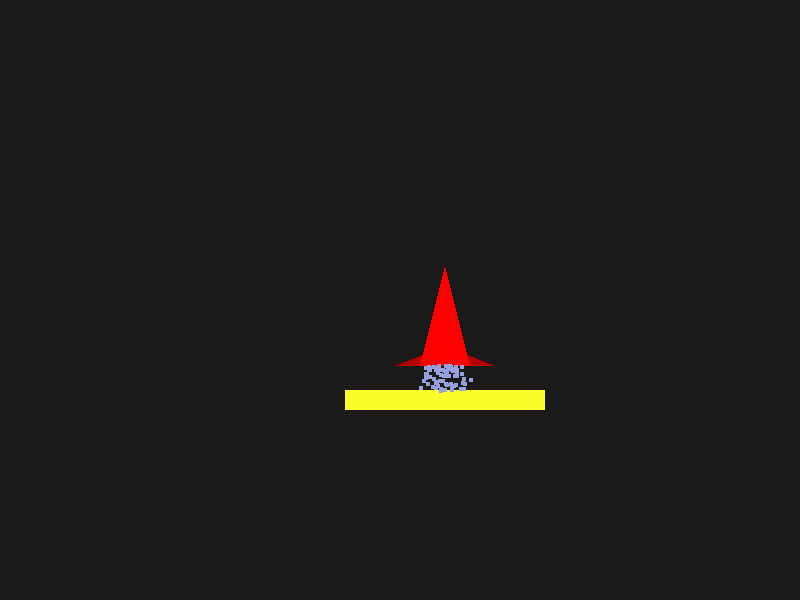
Here's some progress I've made trying to render a heart beat... First iteration of my heart image:
 There are some clear issues with this, as the program used doesn't utilize
double buffering, so it flickers and the color fill is very spotty.
There are some clear issues with this, as the program used doesn't utilize
double buffering, so it flickers and the color fill is very spotty.
My heart animation rendered with double buffering and a better fill, the beating has also been implemented:

Here is an animation of my heart animation as of 11/14/2020.
 I am now using a self-written algorithm to fill the heart. It has
completely removed the issues I was having with missing pixels in the fill.
I have also created a function to handle the curved text. It does this by
generating lines based on fraction of the rendering window. This ensures
that even when the window is resized the text still displays correctly to a
point.
Here is the full filled Heart function I wrote:
I am now using a self-written algorithm to fill the heart. It has
completely removed the issues I was having with missing pixels in the fill.
I have also created a function to handle the curved text. It does this by
generating lines based on fraction of the rendering window. This ensures
that even when the window is resized the text still displays correctly to a
point.
Here is the full filled Heart function I wrote:
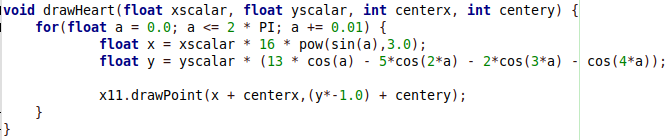
void drawHeartFilled(float xscalar, float yscalar, int centerx, int centery) {
for(float a = 0.0; a <= 2 * PI; a += 0.011) {
//Draws outline
float x = xscalar * 16 * pow(sin(a),3.0)+centerx;
float y = -1.0*(yscalar * (13 * cos(a) - 5*cos(2*a) - 2*cos(3*a) - cos(4*a)))+centery;
x11.drawPoint(x,y);
//If within the first or 3rd quadrant Scan and Fill.
if((a>0.0 && a<(PI/2))|| (a>3*(PI/2) && a<2*PI)){
//Fill for right half of heart.
if(a>0.0 && a<(PI/2)){
/*Code below finds point on bottom half of heart that
/ has the same x-value as top half. It then calculates
/ y-value at the bottom point and fills in between the
/ two points. */
for(float i = (PI/2.0); i <= PI; i += 0.01) {
float foundx = xscalar * 16 * pow(sin(i),3.0)+centerx;
if((int)foundx == (int)x){
float foundy = -1.0*(yscalar * (13 * cos(i) - 5*cos(2*i) - 2*cos(3*i)
- cos(4*i)))+centery;
float yinc = y;
while(yinc < foundy){
yinc += 1.0;
x11.drawPoint(x,yinc);
x11.drawPoint(x-1,yinc);
x11.drawPoint(x+1,yinc);
}
break;
}
}
}
//Fill for left half of heart
if(a>3*(PI/2) && a<2*PI){
for(float i = PI; i <= 3*(PI/2); i += 0.01) {
float foundx = xscalar * 16 * pow(sin(i),3.0)+centerx;
if((int)foundx == (int)x){
float foundy = -1.0*(yscalar * (13 * cos(i) - 5*cos(2*i) - 2*cos(3*i)
- cos(4*i)))+centery;
float yinc = y;
while(yinc < foundy){
yinc += 1.0;
x11.drawPoint(x,yinc);
x11.drawPoint(x-1,yinc);
x11.drawPoint(x+1,yinc);
}
break;
}
}
}
}
}
}
 This is the Final version of the animated heartbeat. I did some edits on
how the text is rendered, and how it is spaced to make it a bit cleaner.
I also added a color variation as the heart beats.
This is the Final version of the animated heartbeat. I did some edits on
how the text is rendered, and how it is spaced to make it a bit cleaner.
I also added a color variation as the heart beats.
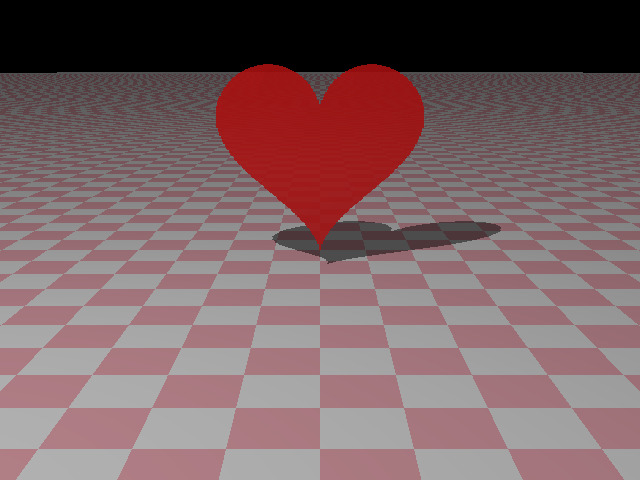
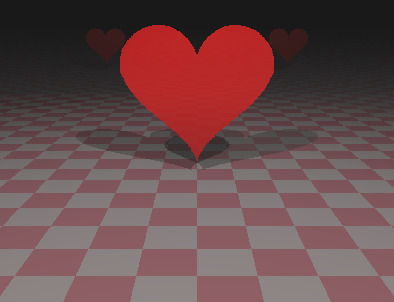
Here is what I have as of 11/24/2020, it is rendered within the raytracer from lab 8. The methodology for rendering the heart is similar to what is done in previous iterations but it now conforms to raytracing practices. In order to get the heart rendered in the raytracer I had to heavily modify my original functions to be able to use it within the new framework. The new function is somewhat similar to the filled heart function listed above, however, now I'm using the math functions in order to detect whether or not a ray passes within the hearts bounds. The general algorith works in a pattern of: Ray shot through pixel on screen > Ray either hits or doesn't hit the hearts plane (detected with the rayPlaneIntersect function from lab 8) > Ray lies within the hearts bounds or does not. The ground within the scene is rendered using the same method that is used in lab 8, and has the same moret pattern we discussed in class.
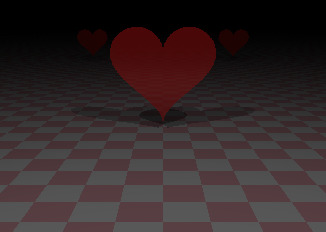
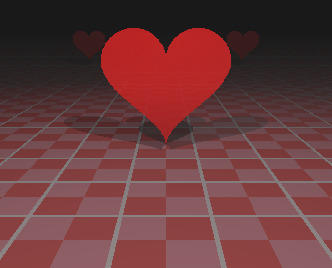
Here is the newest version of the raytraced Heart shape. I added multiple light sources, more heart objects, and a fade that gets stronger the farther something is away from the camera. The fade I'm using is actually a form of light drop off that I devised myself based on some descriptions of similar methods I read about in various articles. The method I use defines a new scalar called distMod that I apply to the scenes colors. distMod is a value based on the distance that can be shown as (1/dist*scalar) where dist is the distance from the hit point to the light source and scalar is some arbitrary scalar that modifies how much fade is applied to the color. Overall the scene is very dark because of this, as the distMod is being applied to every pixel.
Lab-15 Work Done: Here is the work I did during lab 15 period. I worked on making the haze more of a gray/smog color. I also worked on the lighting/fade algorithm to make it look better up close in the scene. I modified the fog color by setting a minimum value any individual rgb component could fade to. This means that I can decide on a floor value for the fog color that the program will fade to at large distances. Along the way the various color components are locked at the floor value after passing through it. This means that the colors fade according to the floor value. In order to make the scene only fade at a certain point I set up some checks within the distMod definition to determine how far away a hit point is from a light source. At a set initial distance from the light sources the fade begins, and at certain points past that initial point the fade gets stronger. This is done by increasing the scalar value in the distMod definition.
 Below I have an image of the work I did to the tiles of my checkerboard pattern on
the floor of the scene. It groups the tiles into 4s and borders them with white.
To be able to accomplish this I've converted the original checkerboard pattern to use
fmod() rather than the int modulo operator %. This means that the percision is increased,
and I'm permitted to change the colors based on smaller differences than even or odd, like
the decimal values that are usually sheared off by the % operator.
In this iteration of the scene the program still has moret-like issues, just in this case
the pattern loses detail much closer to the viewer, as can be scene at about the distance
the first heart is placed within the scene.
Below I have an image of the work I did to the tiles of my checkerboard pattern on
the floor of the scene. It groups the tiles into 4s and borders them with white.
To be able to accomplish this I've converted the original checkerboard pattern to use
fmod() rather than the int modulo operator %. This means that the percision is increased,
and I'm permitted to change the colors based on smaller differences than even or odd, like
the decimal values that are usually sheared off by the % operator.
In this iteration of the scene the program still has moret-like issues, just in this case
the pattern loses detail much closer to the viewer, as can be scene at about the distance
the first heart is placed within the scene.
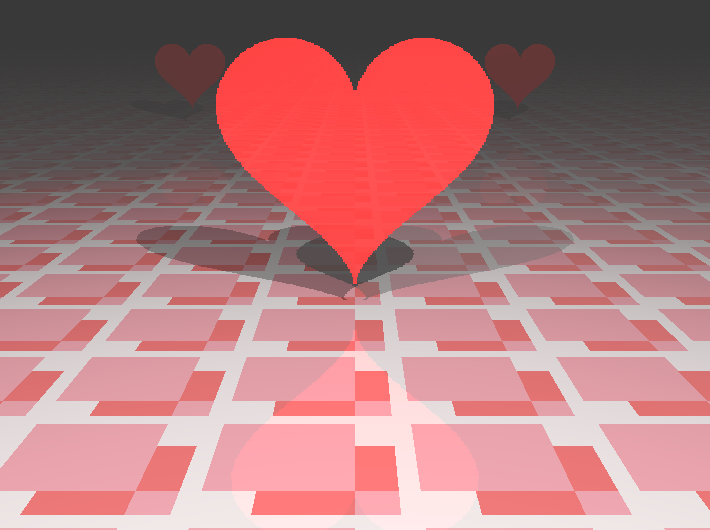
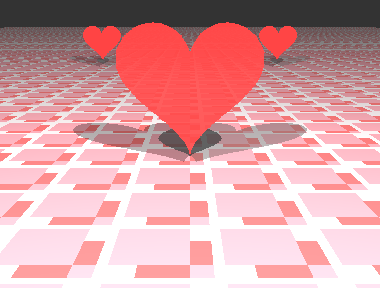
Below is my Final Image. It's a raytraced version of my heart, with softer fade for the atmospheric perspective fade. The fade has also been done in a lighter color, now a gray that looks more fog-like. I worked on the tiling and was having some issues with the white spacing in between tiles falling out of detail, a moire pattern similar to the original checkerboard we implemented in class. I fixed this by increasing the size of the white spacing, as well as changing the camera perspective slightly to increase the detail distance. Once I fixed the white spacing falling out of detail, I tinkered with the tiling until I got a pattern that I liked, which is what is used in the image. I also added some specularity to the floor, and increased the lighting magnitudes. This made the floor overall much brighter and sleek looking, and helped the white pop in the results. In this version the front heart looks almost ghostly, and has a bit more specularity applied which makes it act as a mirror. However, it makes the heart look almost a little transparent which is an effect that I like for the image. Overall I'm very satisfied with the results:
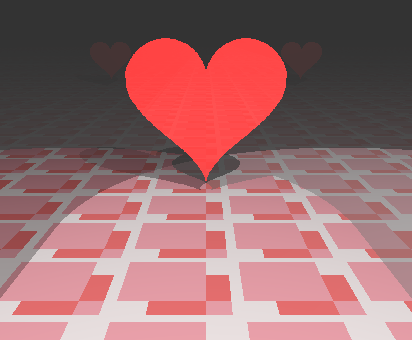
 Here is the same scene, but rendered from the side:
 Here is a view from the floor of the scene:
 I did a rendering with the light fading to a red color, looking like a red mist in the air.
Here that is:
I did a rendering with the light fading to a red color, looking like a red mist in the air.
Here that is:
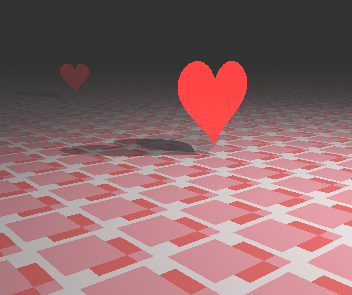
 Here is a rendering of the scene with no haze at all applied, in this image the moret pattern
for the algorithm I'm using to generate the tiles can be seen:
Here is a rendering of the scene with no haze at all applied, in this image the moret pattern
for the algorithm I'm using to generate the tiles can be seen:
 Here is a rendering of the scene with a heavy haze applied, based on the distance from each
light source:
Here is a rendering of the scene with a heavy haze applied, based on the distance from each
light source:
The animation from my lab-6 is right here...
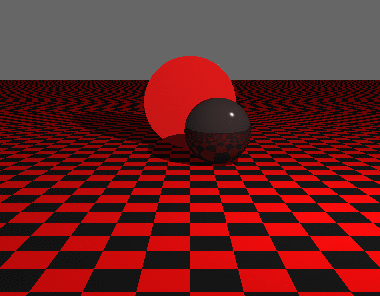
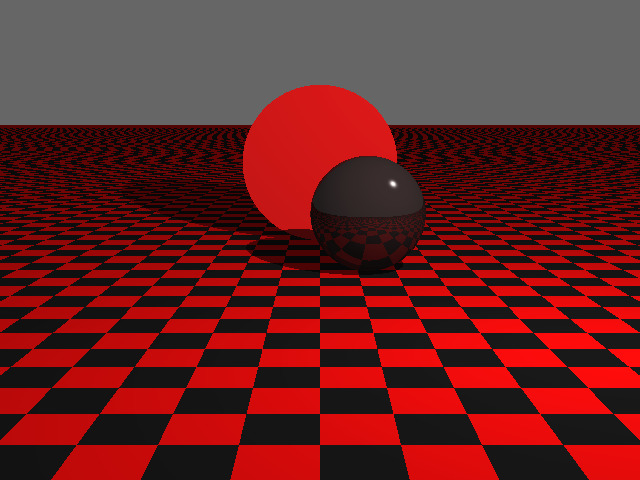
 Here's a picture of my lab 8 rendering...
 Here is a gif of my lab 8 animation...